ClanLib logo

Simple Game Development with ClanLib 6.0

Part 4

Using OpenGL with ClanLib

    In this tutorial, we'll be moving away from the Tic-Tac-Toe example and towards a few more exciting applications for ClanLib. The CL API gives us easy access to the OpenGL hardware acceleration present on most newer video cards. With OpenGL, we can create 2-D or 3-D games with fancy effects like alpha-blending and sprite scaling without the significant slowdowns that can happen when using CL_Display. Another bonus is that OpenGL, like ClanLib, is cross-platform. Direct3D is not.

    While OpenGL is more powerful than CL_Display in many areas, it is also significantly more complex. For a good set of lessons on OGL basics, you can visit NeHe's OpenGL Page. We will be using single polygons to display our sprites, as well as translations, rotations and blending in the next two parts, so be sure to brush up on those areas if you are new to OGL.

    Fig 11.
    Thumbnail of Screenshot

    Above is a screenshot from a ClanLib game that uses OpenGL. If you take a look at the larger version, you can see some of those fancy particle and blending effects in action. One of the things I am most often asked about is how to create good-looking exhaust and explosion effects - so in this part of the tutorial and the next we will build a particle system similar to the one used in the game, as well as covering the basics of how to intialize and use OpenGL with ClanLib.

    We'll start by creating an empty win32 Application and an empty CL framework which you can get from part 1. We'll be calling our main class Particles. (Note that from here on, I'll be focusing only on the important code - a complete listing is available in the workspace zip file at the bottom.)

    Fig 12.
    class Particles : public CL_ClanApplication {
    
    public:
    	// Set up the GL scene
    	void GLInit();		
    	// Draw a sprite with GL
    	void GLDrawSprite(float spriteSize); 
    	
    	char *get_title() { return "ParticlesApp"; }
    	virtual int main(int, char **);
    
    	Ship myShip;
    };
The Ship

    Note the instance of Ship - our aim for this tutorial is to put an image of a ship on the screen and have it fly in a circle. Later we'll add the particles that make up the exhaust plume. First, though, we'll store the ship's properties in a struct (simply equivalent to a class without functions and all members public).

    Fig 13.
    struct Ship {
    
    	float theta;		// The current position in the circle
    	Vector2 location;	// The cartesian (XY) location of the ship
    	CL_Texture *shipImage;	// OpenGL texture containing the ship
    };

    One of the ways ClanLib makes using OpenGL easier is that it can automatically load textures from supported image types. Normally, we would have to write our own methods for doing this or use an external library. But here, we simply store a CL_Texture pointer and call bind() when we want to use it in OpenGL. For users familiar to OGL, this is virtually equivalent to using glBind(...).

CL_ResourceManager

    ClanLib provides a convenient way of including different types of resources like images, sounds, or even numbers without compiling them into the code of your game. It does this by using a seperate resource file that is read in by the CL_ResourceManager class on startup (or whenever you need it to). A sample resource file looks like this:

    Fig 14.
    section Graphics
    {
    	ship = ship_targa.tga (type=surface);
    	graphic_2 = crosshairs.tga (type=surface);
    }
    section Sounds
    {
    	gong = gong_gong.wav (type=sound);
    }
    

    Now if you decide that ship_targa.tga isn't the best file for your application, you can simply open up your resource file with any text editor and enter a different image filename. The resource name that we can use inside the application contains the section name followed by a forward slash, then the resource name, like this: "Graphics/ship" for the first graphic file. Sections can be nested just like a file system.

    Here's the resource file we'll use (named resource.dat). Below is the code we'll use to create the ResourceManager in our application, along with reading in the CL_Texture pointers for the images. You can also use CL_ResourceManager to load CL_Surface pointers for use with CL_Display.

    Fig 15-16.
    ... In 'Resource.dat' ...
    section Graphics
    {
    	ship = ship.tga (type=surface);
    }
    ... After CL_SetupCore::init() ...
    
    CL_ResourceManager manager("resource.dat", false);
    myShip.shipImage = CL_Texture::load("Graphics/ship", &manager);
Vector2

    This is a slight deviation from CL on my part - though the API includes its own 2-D Vector class, I have included my own simple one. It provides a way of translating between polar and Cartesian coordinate systems, as I have found it more intuitive to store movements as a direction and magnitude (polar), rather than two magnitudes (Cartesian). It does contain an example of operator overloading, but that's outside the scope of this tutorial.

The Spin Cycle
    Fig 17.
    GIF Ship preview

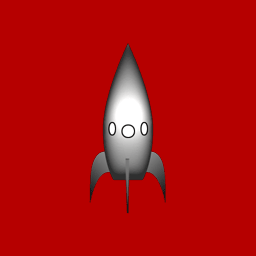
    This is our trusty rocket ship, a 32-Bit Targa file, with red indicating transparency. In Photoshop, creating the mask that marks certain areas transparent is as simple as making a selection, creating a new channel, and filling the selection on the new channel layer. In other editors it should be a similar process.

    Let's move on to the ClanLib/OpenGL initialization code; its basic form is the same as the CL_SetupCore and CL_SetupDisplay we saw earlier.

    Fig 18.
    CL_SetupGL::init();
    
    ... Main body & GL Code ...
    
    CL_SetupGL::deinit();

    Before we can begin drawing things with OpenGL, we have to set up our screen viewport, projection and the various GL attributes like blending and clear color. This is what's going on in Fig. 19, and it should only be done once CL_SetupGL::init() has been called. For detailed explanations of the GL properties being set, see the OpenGL Red and Blue reference books or NeHe.

    Fig 19.
    void Particles::GLInit() {
    
    	// Enable texture mapping
    	glEnable(GL_TEXTURE_2D);
    	// Enable blending functions	
    	glEnable(GL_BLEND);
    	// Set standard blending for the alpha mask
    	glBlendFunc(GL_SRC_ALPHA, GL_ONE_MINUS_SRC_ALPHA);
    	// Set the background color to black
    	glClearColor(0, 0, 0, 0);
    	// Set the current color to white
    	glColor3f(1, 1, 1);
    	// Set the size of the window
    	glViewport(0, 0, SCREENWIDTH, SCREENHEIGHT);	
    	// This is all 2D, so we can leave out depth testing		
    	glDisable(GL_DEPTH_TEST);	
    
    	// Set up the projection matrix
    	glMatrixMode(GL_PROJECTION);
    	// Clear matrix
    	glLoadIdentity();
    
    	// This is the only remarkable OpenGL line - it sets the display mode 
    	// to 'orthogonal' so we can treat the view as a flat surface.
    	glOrtho(0, SCREENWIDTH, SCREENHEIGHT, 0, -1, 1);
    }

    Now that GL is initialized the way we need it, we can add the main loop and the rest of the rocket code to the main() function.

    Fig 20.
    // =========================================================================
    // Screen Loop
    // =========================================================================
    
    while (!CL_Keyboard::get_keycode(CL_KEY_ESCAPE)) {
    
    	// Clear the OpenGL screen buffers for the new frame
    	glClear(GL_COLOR_BUFFER_BIT | GL_DEPTH_BUFFER_BIT);
    
    	// Reset the GL modelview matrix
    	glMatrixMode(GL_MODELVIEW);
    	glLoadIdentity();
    
    	// =====================================================================
    	// Move Ship
    	// =====================================================================
    	
    	// Translate to the center
    	glTranslatef(SCREENWIDTH/2, SCREENHEIGHT/2, 0);
    	
    	// Calculate position of ship based on current theta (angle)
    	myShip.location.setXY(100.0f*cos(myShip.theta), 100.0f*sin(myShip.theta));
    
    	// Translate to the ship's location
    	glTranslatef(myShip.location.getX(), myShip.location.getY(), 0);
    	
    	// Rotate the ship so it's always moving forwards
    	glRotatef(myShip.theta*180/PI, 0, 0, 1);
    
    	// Update the ship rotation
    	if (myShip.theta < 2*PI)	
    		myShip.theta -= float(PI/180);
    	else 
    		myShip.theta = 0;
    		
    	// =====================================================================
    	// Display Ship
    	// =====================================================================
    			
    	// Bind the ship CL_Texture
    	myShip.shipImage->bind();
    	
    	// Create a textured quad
    	glBegin(GL_QUADS);
    		glTexCoord2f(0,0); glVertex2f(-spriteSize, -spriteSize);
    		glTexCoord2f(1,0); glVertex2f(spriteSize, -spriteSize);
    		glTexCoord2f(1,1); glVertex2f(spriteSize, spriteSize);
    		glTexCoord2f(0,1); glVertex2f(-spriteSize, spriteSize);
    	glEnd();
    
    	// Clanlib utility statements
    	CL_Display::flip_display();
    	CL_System::sleep(10);
    	CL_System::keep_alive();
    }

    Nothing excessively complicated here, if you're comfortable with OpenGL transformations and some basic trigonometry.

Round and Round